
In brief:
- The fastest way to reduce compressor noise is by replacing the intake filter, adding anti-vibration pads, and installing an intake silencer.
- Correctly identifying the source of noise is key to effective reduction, with the main sources being intake, exhaust, mechanics, and vibration.
The fastest and most reliable way to reduce compressor noise is through three steps: immediately replacing the intake filter, installing anti-vibration pads under the machine, and fitting an intake silencer. These measures can be carried out within a single shift, require no specialized tools, and deliver measurable results. Medium-term steps, such as acoustic enclosures and pipe silencers, should be planned over days to weeks. Investment decisions, such as switching to a screw compressor with VSD drive, should be considered when the existing machine no longer meets operational or safety requirements.
Quick steps for immediate effect:
- Check and replace the intake filter. A clogged filter increases intake vacuum, changes the frequency characteristics of the noise, and accelerates component wear.
- Top up or replace the lubricant in the bearings. Insufficient lubrication is one of the most common causes of mechanical noise.
- Tighten all mounting bolts and fasteners. Loose parts resonate and amplify transmitted noise.
- Place the compressor on rubber anti-vibration pads or silent blocks.
- Check the flexible couplings between the compressor and the piping.
When to call a specialist: If damaged bearings are suspected (metallic squealing, uneven running), in case of resonance affecting the entire structure or floor, and when a soundproof enclosure with controlled ventilation is required.
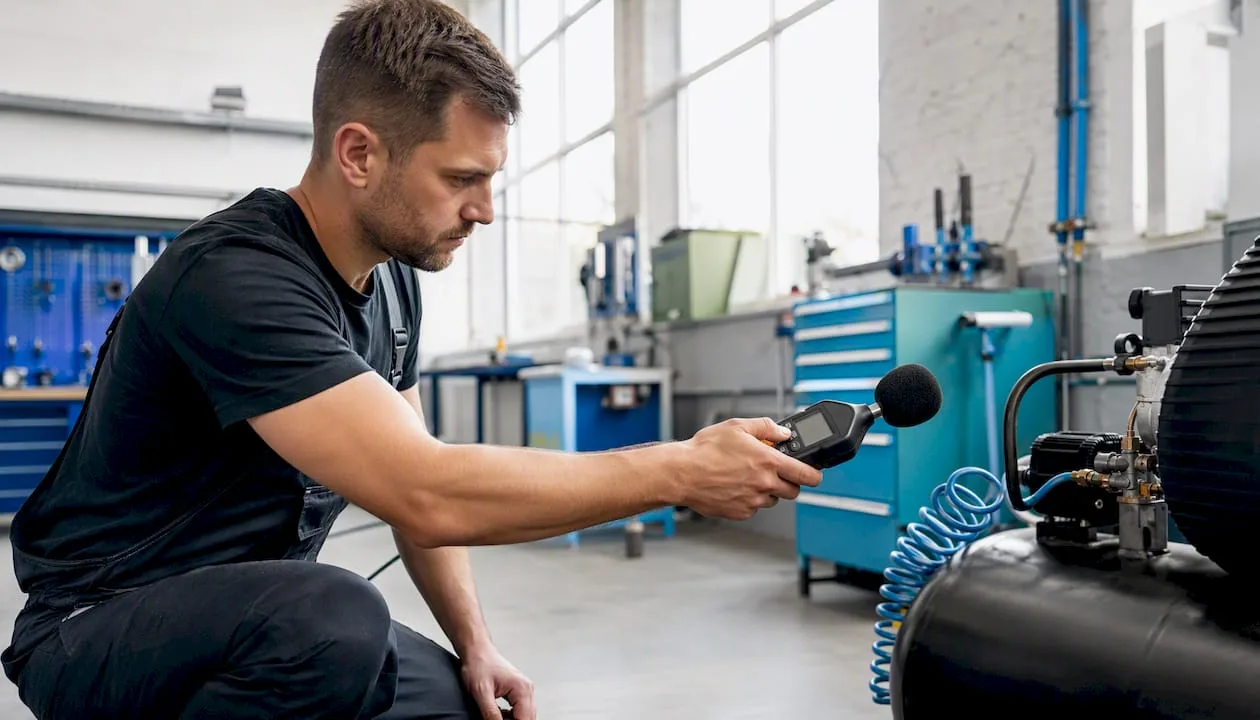
Professional tip: Before making any intervention, measure the baseline noise level with a sound level meter. Without a baseline value, it is not possible to objectively verify whether the measure is effective.
Contents
- What are the main sources of compressor noise and how to quickly identify them?
- How to measure noise levels in the workplace and what are the reference values for compressors?
- What immediate measures can be taken during a single shift?
- How to design an acoustic enclosure or cabin for a compressor?
- Which intake and exhaust silencers to choose and how do they affect back pressure?
- How to properly isolate vibrations and select silent blocks?
- How to choose compressor technology with regard to noise level?
- How to proceed with implementation: from diagnostics to result verification?
- Key takeaways
- Expert note from practice
- Frequently asked questions
What are the main sources of noise in a compressor and how can they be quickly identified?
Compressor noise originates from four basic sources: intake, exhaust, mechanical parts, and vibrations transmitted through the structure. Correct identification of the source determines which measure to apply first.
Overview of noise sources:
- Intake: Pulsating airflow into the compressor generates low-frequency noise. A clogged filter makes the situation worse.
- Exhaust and pulsation: The discharge side produces pressure pulses, especially in piston compressors.
- Mechanical parts: Bearings, gears, and the piston mechanism produce noise when worn or inadequately lubricated.
- Motor: The electric motor adds electromagnetic and ventilation noise.
- Piping and airflow: Sharp bends, constrictions, and unsuitable pipe lengths cause aerodynamic noise and resonance.
- Structure-borne vibration: The compressor transmits vibrations through the frame, floor, and fixed piping throughout the entire building.
Distinguishing between airborne noise and structure-borne noise is crucial, as each type requires a different measure. Use sound insulation (enclosures, panels) against airborne noise. Anti-vibration elements address structure-borne noise.
Quick identification procedure:
- Place your hand (or a vibration meter) on the frame and piping while running. Strong vibrations in the frame indicate structural transmission.
- Temporarily disconnect the intake filter and compare the noise. A significant change confirms intake as the dominant source.
- Check the exhaust side and the air tank. Metallic knocking or hissing indicates exhaust pulsations or leaks.
- Listen to the bearings while idling without load. Squeaking or an irregular sound indicates mechanical wear.
Professional tip: If the noise sounds different under loaded and unloaded operation, it is predominantly an aerodynamic or exhaust source. If the character does not change, look for a mechanical or vibration origin.
How to measure the noise level in the workplace and what are the approximate values for compressors?
Measuring noise before and after an intervention is a prerequisite for verifying the effect of the measures taken. Without documented values, it is not possible to prove improvement or compliance with occupational health and safety requirements.
Approximate noise levels by compressor type
| Compressor type | Approximate noise level |
|---|---|
| Piston compressor (standard) | 75–85 dB(A) |
| Screw compressor | 65–75 dB(A) |
| Quiet/oil-free model (scroll, special) | 60–70 dB(A) |
These values are indicative and depend on the output, age of the machine, and installation conditions. A more detailed overview of the impact of noise on the working environment is provided in the article on quiet compressor operation.
Step-by-step measurement procedure
- Use a calibrated class 2 sound level meter or higher. Mobile apps are indicative only, not sufficient for occupational health and safety documentation.
- Position the microphone at a height of 1.5 m above the floor, 1 m from the surface of the compressor.
- Perform the measurement at full load, at idle, and at startup.
- Record the values from four sides of the machine and calculate the average.
- Repeat the measurement after each intervention and document the results.
Safety notice: In case of continuous exposure above 80 dB(A), the use of personal hearing protection equipment is mandatory. Above 85 dB(A), the employer must implement a hearing protection program and record employee exposure in accordance with Government Regulation No. 272/2011 Coll. An overview of noise reduction methods in the context of occupational health and safety can also be found in the article on noise reduction in operation.
What immediate measures can be taken during a single shift?
Most low-cost measures do not require shutting down the machine for more than one hour. Below, the steps are ordered according to their typical impact on noise level.
Shift checklist:
- Check and replace the intake filter. A clogged filter changes the noise characteristics and increases component stress.
- Top up lubricant in bearings and gears according to the service schedule.
- Tighten all mounting bolts, clamps, and pipe fastenings.
- Check the condition of the rubber pads under the compressor. Hardened or cracked pads stop dampening vibrations.
- Install flexible couplings (compensators) between the compressor and the fixed piping.
- Remove or replace sharp elbows in the piping with large-radius bend fittings.
- Check the air tank and piping for leaks. Hissing indicates air is escaping and adding to the noise.
Proper compressed air filtration protects the compressor as well as the downstream equipment, while also contributing to more stable and quieter operation.
Order of interventions by priority
- Replacement of the intake filter (immediate effect, low cost).
- Checking the lubrication and topping up the oil.
- Tightening fasteners and removing loose parts.
- Installing anti-vibration pads or silent blocks.
- Fitting flexible couplings on the discharge piping.
Professional tip: After each intervention, measure the noise level and record the result. If a given step did not produce a measurable change, move on to the next one. This way you can quickly identify the dominant noise source and avoid wasting effort on secondary causes.
How to design an acoustic enclosure or cabin for a compressor?
An acoustic enclosure can reduce the noise level by 10–20 dB(A), but only if it is designed correctly. The most common mistake is neglecting ventilation, which leads to overheating and machine failures.
Principles of acoustic enclosure design:
- Combine sound absorption (mineral wool, acoustic foam) with a rigid insulating shell (steel sheet, sandwich panel).
- Provide access doors or removable panels for servicing. An enclosure without access makes maintenance impossible.
- Fit every cooling opening with flow silencers (baffle-type or absorption silencers) so they do not cancel out the acoustic effect of the enclosure.
- Size the ventilation openings so that the temperature inside the enclosure does not exceed the compressor's operating limit.
- Line the interior surfaces with absorbent material to reduce reflections.
- Seal pipe grommets acoustically, not just mechanically.
Detailed requirements for compressor room design, including ventilation and noise reduction, are summarized in the guide to basic compressor room requirements.
Checklist for the designer:
- Access doors with acoustic sealing
- Silencers on both the intake and exhaust openings of the enclosure
- Heat dissipation with controlled air flow
- Interior absorbent lining on all surfaces
- Acoustically sealed grommets for piping and cabling
- Temperature sensor with alarm in case of overheating
Professional tip: Integrate ventilation into the design from the start, not as an afterthought. Openings added later without silencers will cancel out most of the acoustic effect of the enclosure.
Which intake and exhaust silencers to choose and how do they affect back pressure?
Silencers are the most effective measure against medium- and high-frequency noise on intake and exhaust piping. Each type works on a different principle and is suitable for a different frequency range.
Types of silencers and their application:
- Resistive (absorption) silencers: Absorb sound using porous material. Effective for medium and high frequencies, low pressure drop.
- Reactive (impedance) silencers: Work on the principle of wave reflection and interference. Suitable for low frequencies and exhaust pulsations.
- Combined (impedance mix): Combine both principles, wider frequency coverage.
- Microperforated silencers: Thin perforated plates without absorption material. Suitable where fibrous material cannot be used (clean operations).
Comparison of silencer types
| Silencer type | Main advantage | Disadvantage |
|---|---|---|
| Absorption (resistive) | Low pressure drop, easy installation | Less effective for low frequencies |
| Reactive (impedance) | Effective for low frequencies and pulsations | Higher pressure loss, larger dimensions |
| Combined | Wider frequency coverage | Higher cost, more complex design |
| Microperforated | Suitable for clean operations | Lower overall efficiency |
Back pressure is a key trade-off: every silencer increases resistance in the piping. When sizing, select a silencer with pressure losses up to 0.5% of the compressor's operating pressure, otherwise output decreases and energy consumption increases.
Installation principles: Place the silencer as close as possible to the noise source. Avoid resonant pipe lengths (lengths corresponding to a quarter of the wavelength of the dominant frequency). Flexible couplings before and after the silencer prevent the transmission of vibrations into the piping.
How to properly isolate vibrations and select silent blocks?
Vibrations transmitted through the structure are the second most common source of noise in compressor rooms. Rigidly connected piping and frames act as acoustic bridges and spread noise throughout the building.
Types of anti-vibration solutions:
- Rubber pads: The simplest and cheapest solution for smaller compressors. Suitable for frequencies above 20 Hz.
- Spring mounts: More effective for heavier machines and low vibration frequencies. Allow precise stiffness adjustment.
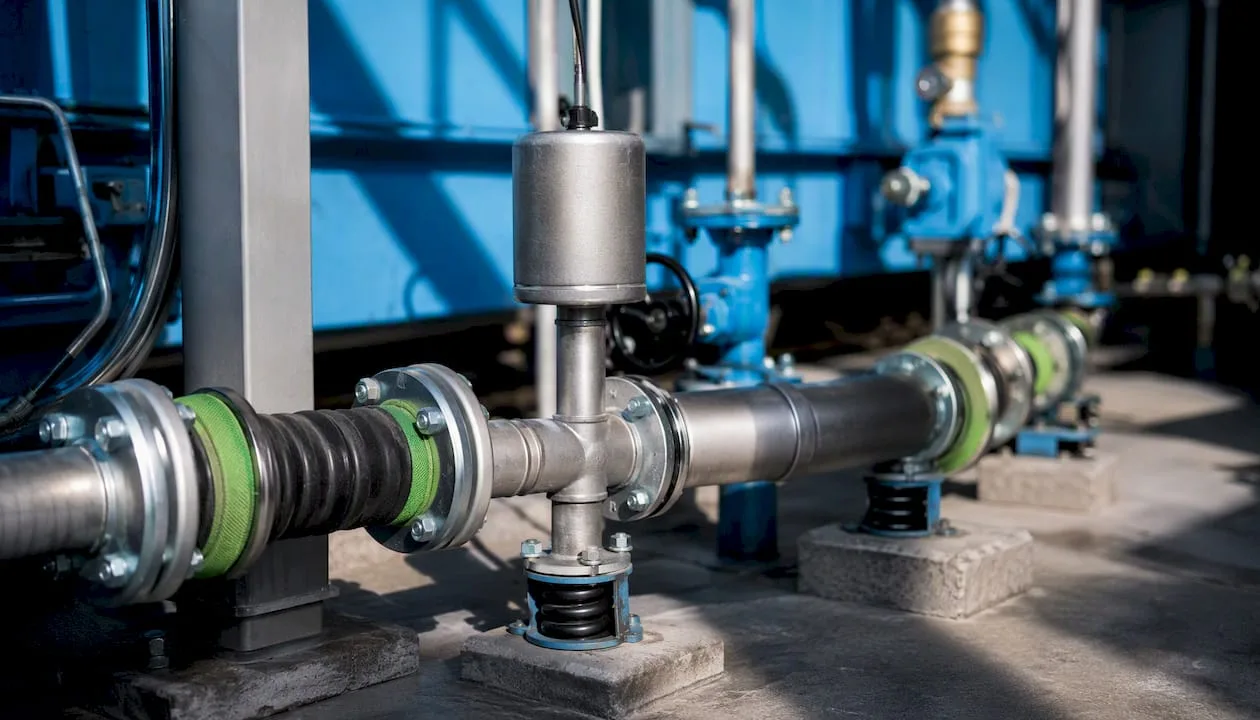
- Flexible couplings and corrugated hoses: Interrupt the transmission of vibrations from the compressor to the fixed piping. A mandatory part of every installation.
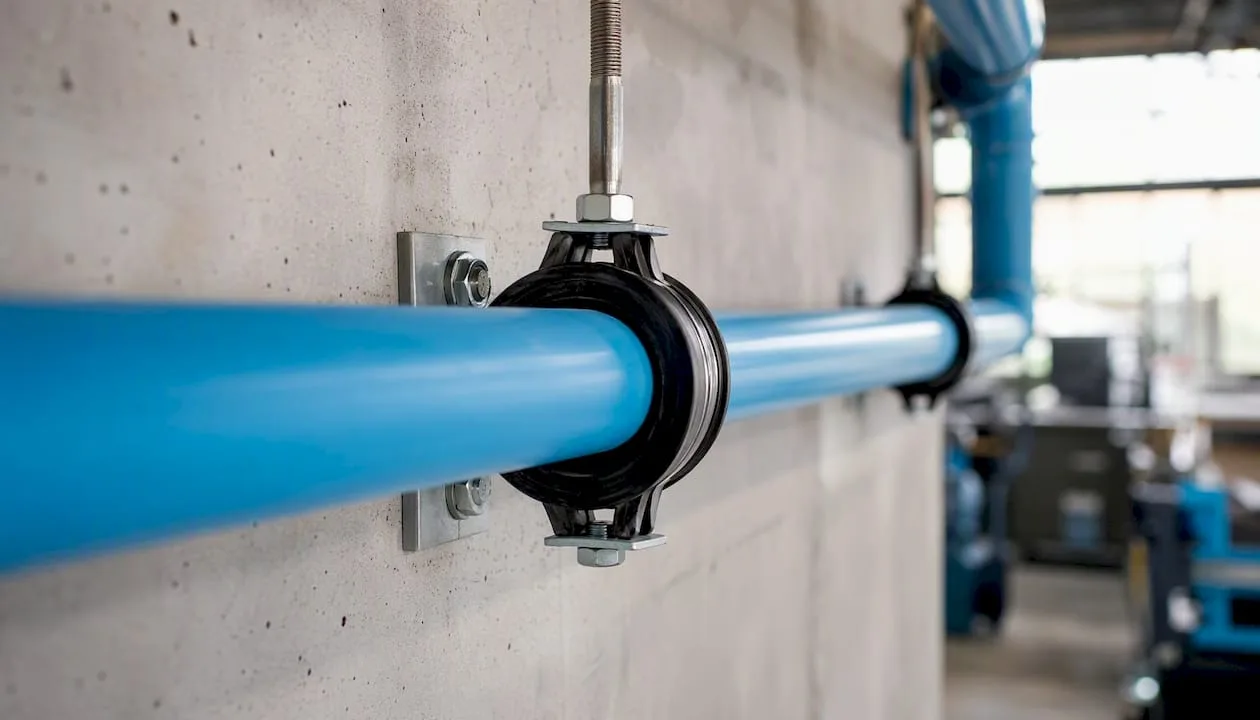
- Flexible pipe hangers: Prevent the transmission of vibrations from the piping to the ceiling or wall structure.
Sizing of the silent block depends on the weight of the machine and the frequency of the dominant vibrations. A silent block that is too stiff does not flex, while one that is too soft causes instability. Manufacturers state the load capacity and frequency range in the technical data sheet.
Diagnostic checklist for installation:
- Are all four (or more) pads evenly loaded? Check the alignment of the machine.
- Are flexible couplings fitted on both the discharge and suction piping?
- Is the piping suspended on flexible hangers, not rigidly bolted to the wall?
- Are thermal expansions of the piping compensated?
- Are there no rigid contacts between the compressor and the surrounding structure (bolts, pipes, cables routed without grommets)?
Professional tip: The most common acoustic bridge occurs where the installer firmly bolts the piping to the wall right after the flexible coupling. The flexible coupling then has no effect. The piping must be suspended on flexible hangers along its entire length, not just at the point of connection to the compressor.
How to choose a compressor technology with regard to noise level?
The choice of technology is the most important decision when planning a new installation or replacing an existing machine. Noise level is one of the key parameters alongside output, pressure, and operating costs.
Comparison of technologies by noise level:
- Piston compressors: Highest noise level, typically 75–85 dB(A). Suitable for intermittent operation and lower outputs. For continuous operation in enclosed spaces, noise insulation is required.
- Screw compressors: Medium noise level, 65–75 dB(A). Suitable for continuous operation. Lower exhaust pulsation compared to piston compressors.
- Scroll compressors and special quiet models: Lowest noise level, 60–70 dB(A). Suitable for sensitive environments (laboratories, healthcare, offices). Higher purchase price.
- VSD (variable speed drive): Reduces motor speed at lower air demand. The result is lower noise at partial load and lower energy consumption. In operations with variable load, a VSD compressor can eliminate the need for a separate soundproofed compressor room.
Practical parameters for selecting an industrial compressor, including noise level, are summarized in the guide to selecting an industrial compressor.
When to invest in new technology instead of soundproofing the existing machine:
- The existing compressor is older than 10 years and requires frequent repairs.
- The operating profile has changed to continuous or variable load.
- The noise level of the existing machine exceeds 80 dB(A) even after all measures have been implemented.
- The costs of noise reduction exceed 30–40% of the value of a new machine.
How to proceed with implementation: from diagnostics to verification of results?
A systematic approach shortens the implementation time and prevents wasting resources on measures that will not produce an effect.
Implementation phases
- Preparation and measurement (hours): Measure the baseline noise level from four sides of the machine under full load. Identify the dominant source (intake, exhaust, mechanics, vibration). Document the results.
- Quick interventions (hours to 1 day): Filter replacement, lubricant top-up, fastening tightening, installation of anti-vibration pads and flexible couplings. Estimated costs: low (hundreds to low thousands CZK).
- Medium-term measures (days to 2 weeks): Installation of intake and exhaust silencers, piping route adjustments, installation of flexible hangers. Estimated costs: medium (thousands to tens of thousands CZK).
- Long-term investments (weeks to months): Construction of an acoustic enclosure or cabin, transition to quieter technology (VSD, screw or scroll compressor). Estimated costs: higher (tens to hundreds of thousands CZK).
Checklist for verifying the effect:
- Measure the noise level after each phase, from the same locations as in the baseline measurement.
- Compare the values before and after. A successful measure will result in a measurable decrease.
- Document each intervention: date, description, measured values.
- If the noise does not decrease after quick interventions, proceed to medium-term measures without delay.
- An integrated solution in the compressor room design (absorption, isolation, pipe insulation) reduces overall costs and increases efficiency compared to gradual, separate interventions.
When to contact Kompresory-vzduchotechnika service: If damaged bearings or serious mechanical faults are suspected, when a design for an acoustic enclosure with controlled ventilation is needed, when selecting new technology, or when noise measurement and documentation for occupational health and safety purposes is required. The Kompresory-vzduchotechnika team provides technical consulting, service interventions, and turnkey solution designs.
Key findings
The fastest and most reliable reduction of compressor noise is achieved by combining immediate maintenance, anti-vibration mounting, and intake silencers, with each measure verified by measurement before and after the intervention.
| Item | Details |
|---|---|
| Immediate measures | Filter replacement, lubrication, and tightening of fasteners can be carried out during a single shift with minimal costs. |
| Anti-vibration mounting | Silent blocks and flexible couplings interrupt the transmission of vibrations into the structure and piping. |
| Intake and exhaust silencers | Absorption silencers reduce mid- and high-frequency noise with low pressure loss. |
| Acoustic enclosure | A properly designed enclosure with ventilation silencers will reduce the noise level by 10–20 dB(A). |
| Technology selection | VSD and screw compressors achieve 65–75 dB(A), quiet models and scroll compressors 60–70 dB(A). |
Expert note from practice
Technicians in operation most often focus on the acoustic enclosure as the first solution, because it is visible and appears comprehensive. However, practice shows that an enclosure built over a machine with loose bolts, hardened washers, and a clogged filter will deliver only a fraction of the expected effect. The noise simply travels further through the piping into the building.
The correct order is the opposite: first eliminate the causes of noise at the source, then isolate what remains. This approach is cheaper and the results are more lasting. Investing in an enclosure only makes sense once the machine is running in good technical condition and the remaining noise comes from the compressor's inherent design characteristics that cannot be eliminated.
One thing technicians regularly overlook: piping bolted firmly to the wall right after the flexible coupling. The coupling then serves no function and the vibrations continue to propagate further. Switching to flexible hangers along the entire length of the piping is enough, and the result is immediate.
Frequently Asked Questions
How to soundproof a compressor yourself?
Start by replacing the intake filter, topping up lubricant, and installing rubber anti-vibration pads under the machine. Add flexible couplings to the discharge piping. These measures can be carried out during a single shift without specialized tools.
How many dB does 40 dB(A) correspond to in practice?
A level of 40 dB(A) corresponds to a quiet office or a calm living room. A standard piston compressor reaches 75–85 dB(A), a screw compressor 65–75 dB(A), and quiet models 60–70 dB(A).
How does a scroll compressor work and why is it quieter?
A scroll compressor compresses air using two spiral elements without pistons or valves. The result is smooth, pulsation-free compression with a noise level typically of 60–70 dB(A), which is significantly lower than with piston machines.
How to regulate compressor pressure to reduce noise?
A lower operating pressure means lower load on the machine and lower noise. Set the pressure to the lowest value that still meets the application requirements. VSD drive also automatically adjusts the speed to current demand, which reduces noise under partial load.
When is it necessary to call in a noise measurement specialist?
Professional measurement is necessary when employees are continuously exposed to levels above 80 dB(A), for occupational health and safety documentation, and when designing an acoustic enclosure or compressor room. Kompresory-vzduchotechnika provides technical consulting and measurement as part of its service offerings.
Recommended
- Compressor bleeding procedure: a guide for technicians - Kompresory-Vzduchotechnika.cz
- Noise Reduction in Operation: Methods, Standards and Health Protection - Kompresory-Vzduchotechnika.cz
- Definition of the compressor duty cycle: a guide for technicians - Kompresory-Vzduchotechnika.cz
- The importance of compressor diagnostics for efficient operation - Kompresory-Vzduchotechnika.cz